Altimeter code: Page 2, building a simple apogee altimeter
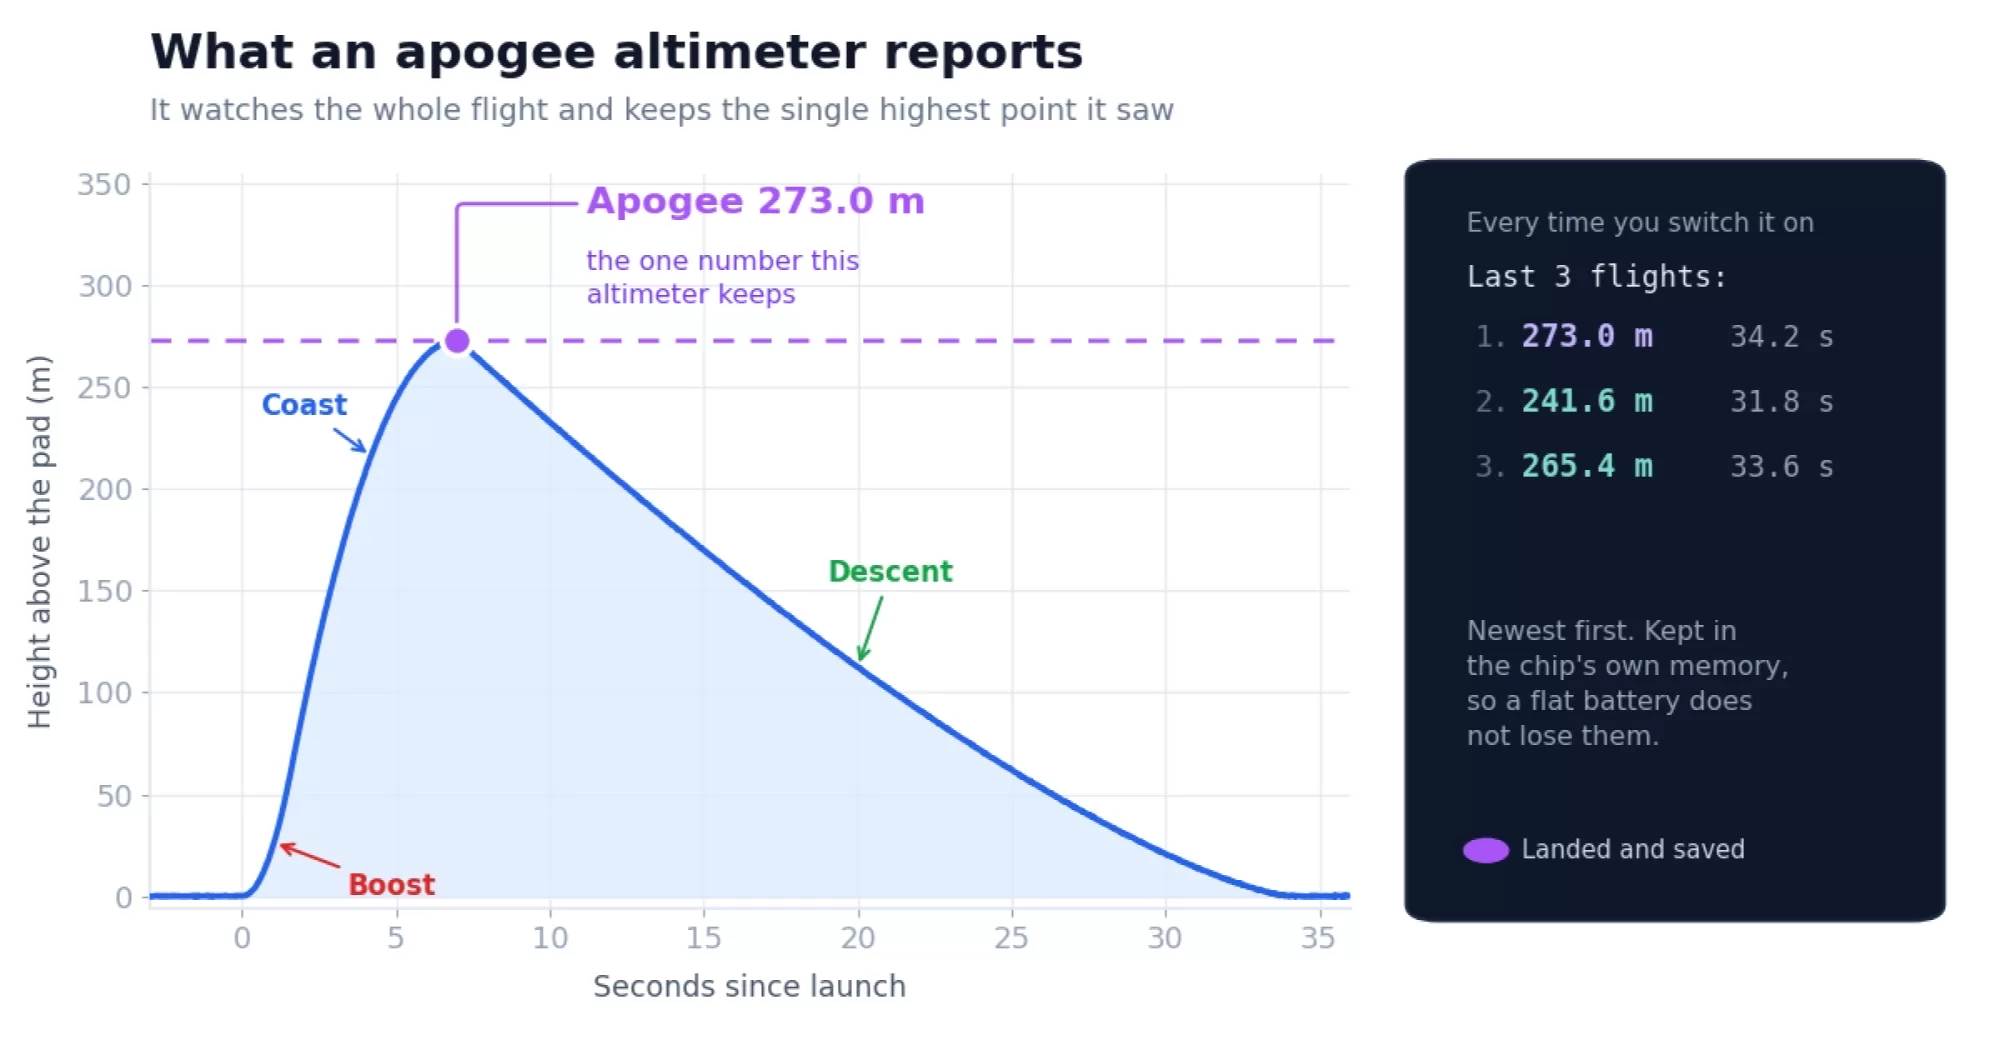
This is the first real project in our DIY model rocket altimeter series. By the end of this page you will have written a working apogee altimeter: it measures the pressure on the launch pad, notices the moment your rocket leaves the ground, tracks the highest point of the flight, and stores the peak altitude in the ESP32's own memory so it is still there after the battery goes flat. It keeps your last ten flights and prints them every time you switch it on.
It is about a hundred lines of Arduino code once you take the comments out, and you can test the whole thing by lifting the board off your desk. If you have not done page 1 yet, start there, because this page assumes the Arduino IDE is set up and you have seen the pressure sensor working.
What it does
The altimeter is always in one of four states, and knowing which is which makes the code much easier to follow.
| State | What is happening | LED |
| Settling | Filling up ten seconds of pressure readings. Not armed yet. | Yellow |
| Armed | Sat on the pad working out the ground pressure, watching for a launch. | Winks green every two seconds |
| Flying | Off the ground. Tracking the highest point and printing the climb. | Solid blue |
| Done | Landed, apogee saved to memory. Nothing left to do. | Three white flashes, then purple |
You can see all four on the desk in under a minute, which is the point of the low trigger height.
Finding the ground
An altimeter does not really measure height, it measures air pressure and works out how far that is from the pressure on the ground. So everything depends on getting that ground reading right, and a single reading is not good enough.
Three things go wrong if you just take one:
- Sensors are noisy. On page 1 you watched the height wander by a couple of centimetres while the board sat still. One reading might land at the top or the bottom of that wander.
- The sensor needs a moment after power up before its numbers settle down.
- Something is usually happening around the rocket right before launch: somebody's hand on the airframe, a gust, an igniter being connected, the launch rod being adjusted.
So this sketch keeps the last ten seconds of readings in a ring of a hundred slots, and takes the ground pressure to be the average of the older half of it. That is the window from ten seconds ago to five seconds ago.
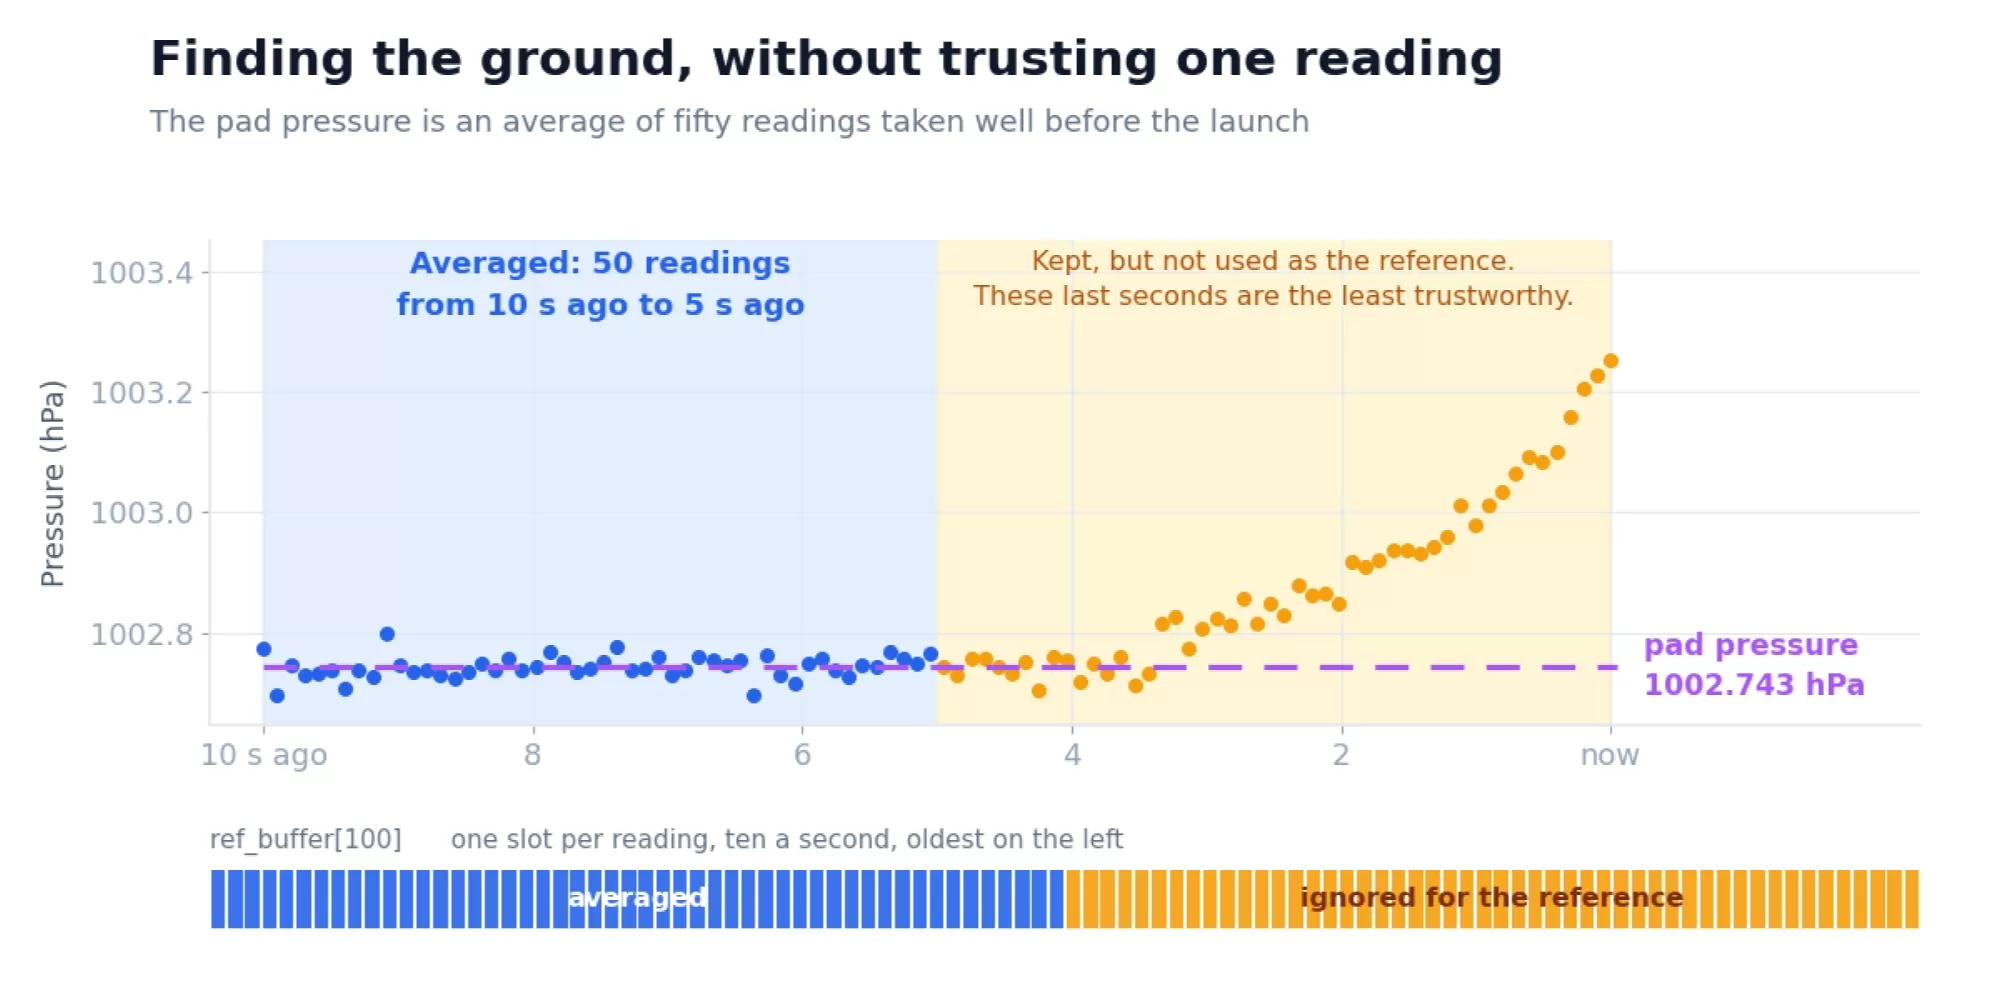
Why deliberately old readings? Because the five seconds immediately before a launch are the least trustworthy part of the whole wait. By the time the motor lights, the reference has already been fixed from a calmer moment, and the fifty readings it averages have smoothed the sensor noise away to almost nothing. It costs nothing and it is what our own firmware does.
While the altimeter is armed, that ground pressure keeps updating with every new reading, so slow weather changes are followed. The instant a launch is detected it stops updating and the whole flight is measured against the ground you actually left.
Spotting the launch
The rule is simply "are we more than X metres up". The sketch has it set to two metres so you can test it at your desk:
#define LAUNCH_HEIGHT   2.0   // Metres above the pad that counts as a launch.
                              // 2 is for testing on your desk.
                              // Use 25 to 40 in a real rocket.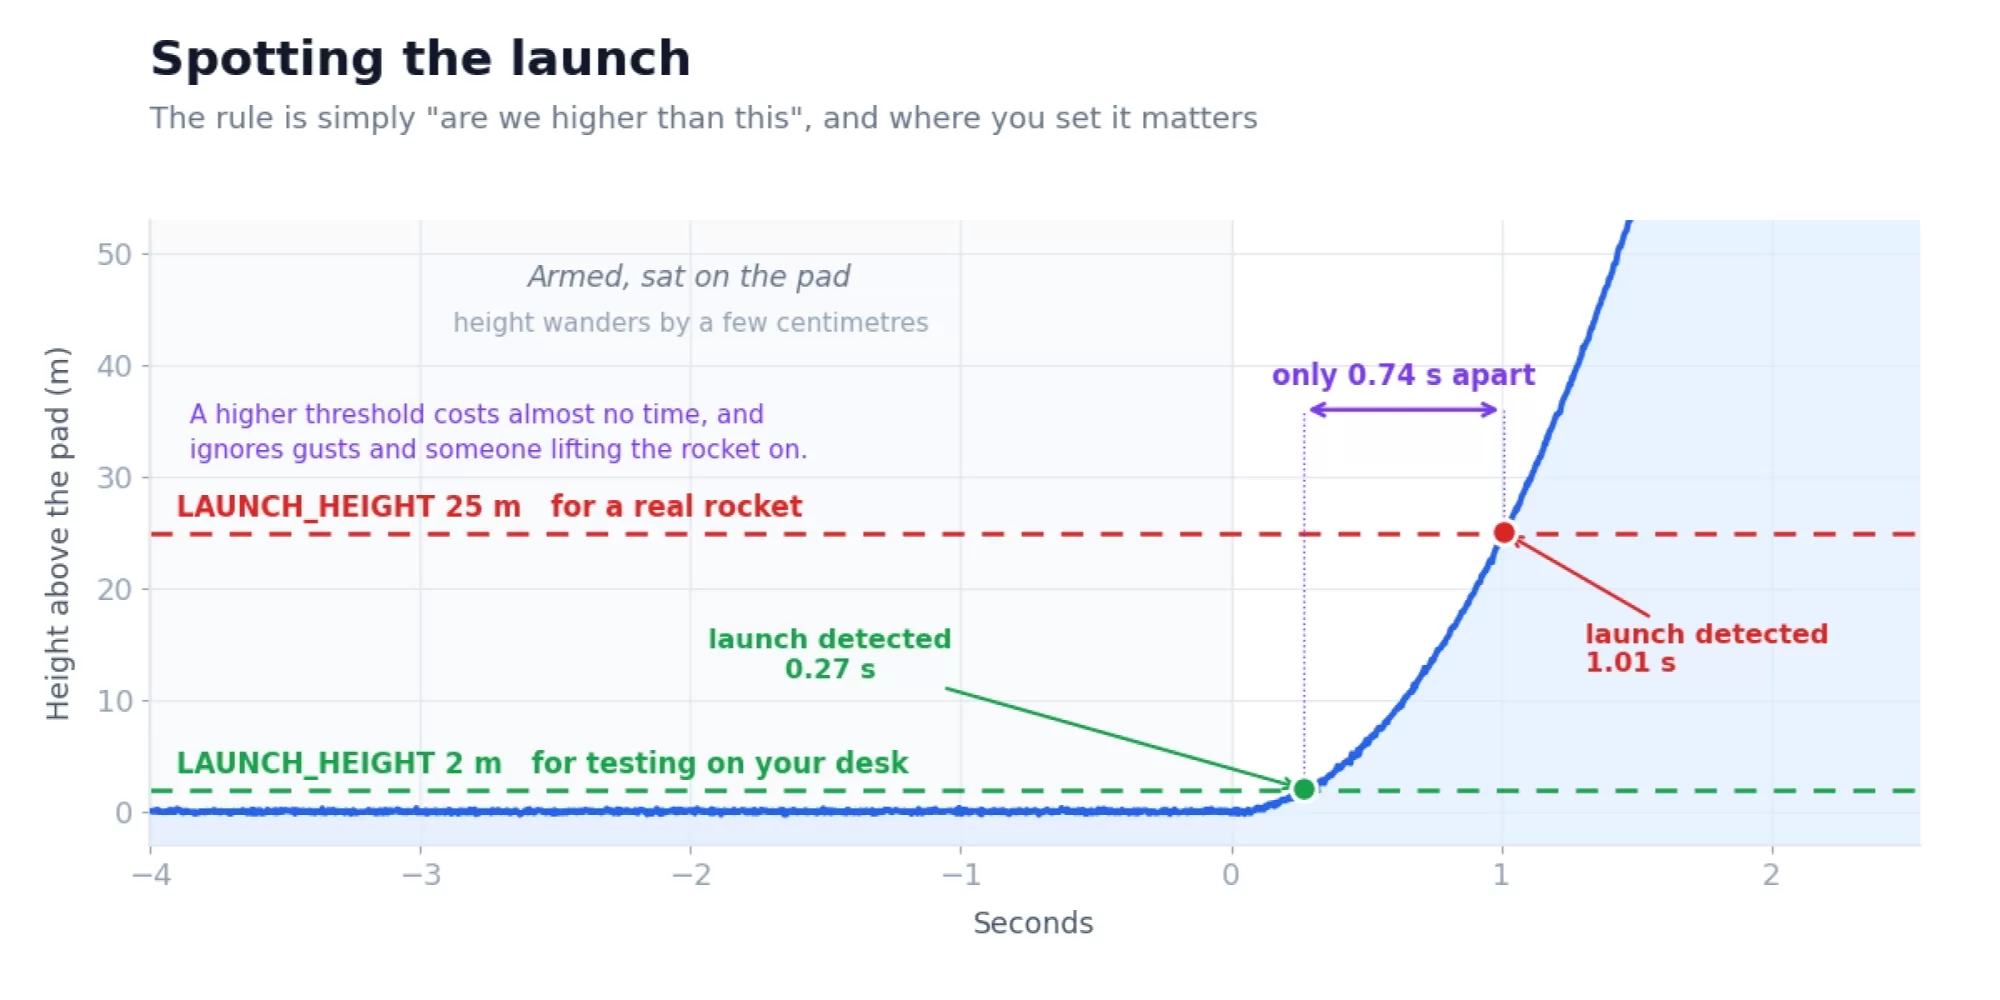
Change this before you fly it. Two metres is far too twitchy for a real launch site. Somebody picking the rocket up to fit it on the rail will trigger it, and so will a decent gust. Twenty five to forty metres is the sensible range: high enough that only an actual launch gets there, low enough that it triggers within the first fraction of a second of the boost.
Real flight computers, ours included, watch the accelerometer as well, because it sees the motor light in a few milliseconds while the pressure sensor is still catching up. That is a later page. For an apogee reading it makes no practical difference: what matters is the highest point, and you will still be there whether you noticed the launch a tenth of a second early or late.
Knowing when it is over
The flight ends when two things are true at once: the height has stopped changing for five seconds, and we are at least a metre below the highest point we saw. Both matter. Without the first, a slow drift under parachute could look like a landing. Without the second, sitting still on the pad before launch would qualify.
There is also a three minute limit, so a rocket that lands on a roof and never quite settles still saves its flight rather than losing it.
Remembering flights
The ESP32 has a small area of flash set aside for exactly this, called NVS, for non volatile storage. Arduino gets at it through the Preferences library. Anything you put in there survives the power going off, the battery being changed, and uploading a new sketch.
Storage is organised into named areas. This sketch uses one called rocketflights:
memory.begin("rocketflights", false);      // false means we can write
memory.putBytes("list", flights, sizeof(flights));
memory.putInt("count", flight_count);
memory.end();
The whole array of ten flights goes in as one lump with putBytes, which is both simpler and kinder to the flash than writing ten separate values. Flash wears out after a lot of writes, and one write per flight will outlast the rocket by a wide margin.
Pick your own area name. Our firmware keeps its settings in NVS too. If you reuse its name you will be writing over its settings, so use something of your own like rocketflights. Also remember that "Erase All Flash Before Sketch Upload" wipes all of it, which is why we said to switch that back to Disabled after your first upload.
To wipe the list, hold BUTTON while the board starts up. The LED flashes purple to confirm.
The sketch
Same layout as last time: pins at the top, then the settings you might want to change, then setup() and loop(), then the smaller functions they use. New sketch, paste it in, upload.
/*
  02_apogee_altimeter.ino

  Mercury altimeter project 2: a simple apogee altimeter

  Part of the Altimeter Cloud "Build your own altimeter" series.
  https://www.altimetercloud.com/nl/rocketry-news/

  Works out the ground pressure properly, waits for a launch, remembers the
  highest point it reached, and keeps the last ten flights in the ESP32's
  built in memory so they survive a flat battery and a re-upload.

  On the desk it triggers at 2 metres so you can test it by lifting it off
  the table. Change LAUNCH_HEIGHT before you fly it. See the article.

  Hold BUTTON while switching on to wipe the stored flights.

  HOW IT WORKS, IN ONE PARAGRAPH
  Ten times a second we read the pressure and drop it into a list holding the
  last ten seconds. The pressure on the ground is taken to be the average of
  the older half of that list. Compare the pressure now against that ground
  pressure and you have a height. When the height goes past LAUNCH_HEIGHT we
  call it a launch, stop updating the ground pressure, and remember the
  biggest height we see until the rocket stops moving.

  Libraries needed (Arduino Library Manager):
    Adafruit NeoPixel        by Adafruit
    Adafruit BMP5xx Library  by Adafruit
    BMP388_DEV               by Martin Lindupp

  Board settings: ESP32C6 Dev Module, USB CDC On Boot ENABLED, Flash Size 4MB,
  Partition Scheme "Default 4MB with spiffs", CPU 160MHz.
*/

// Each #include pulls in someone else's code so we do not have to write it.
#include <Wire.h>                 // talking to chips over the two wire I2C bus
#include <Preferences.h>          // storing things in flash so they survive a power off
#include <Adafruit_NeoPixel.h>    // driving the status LED
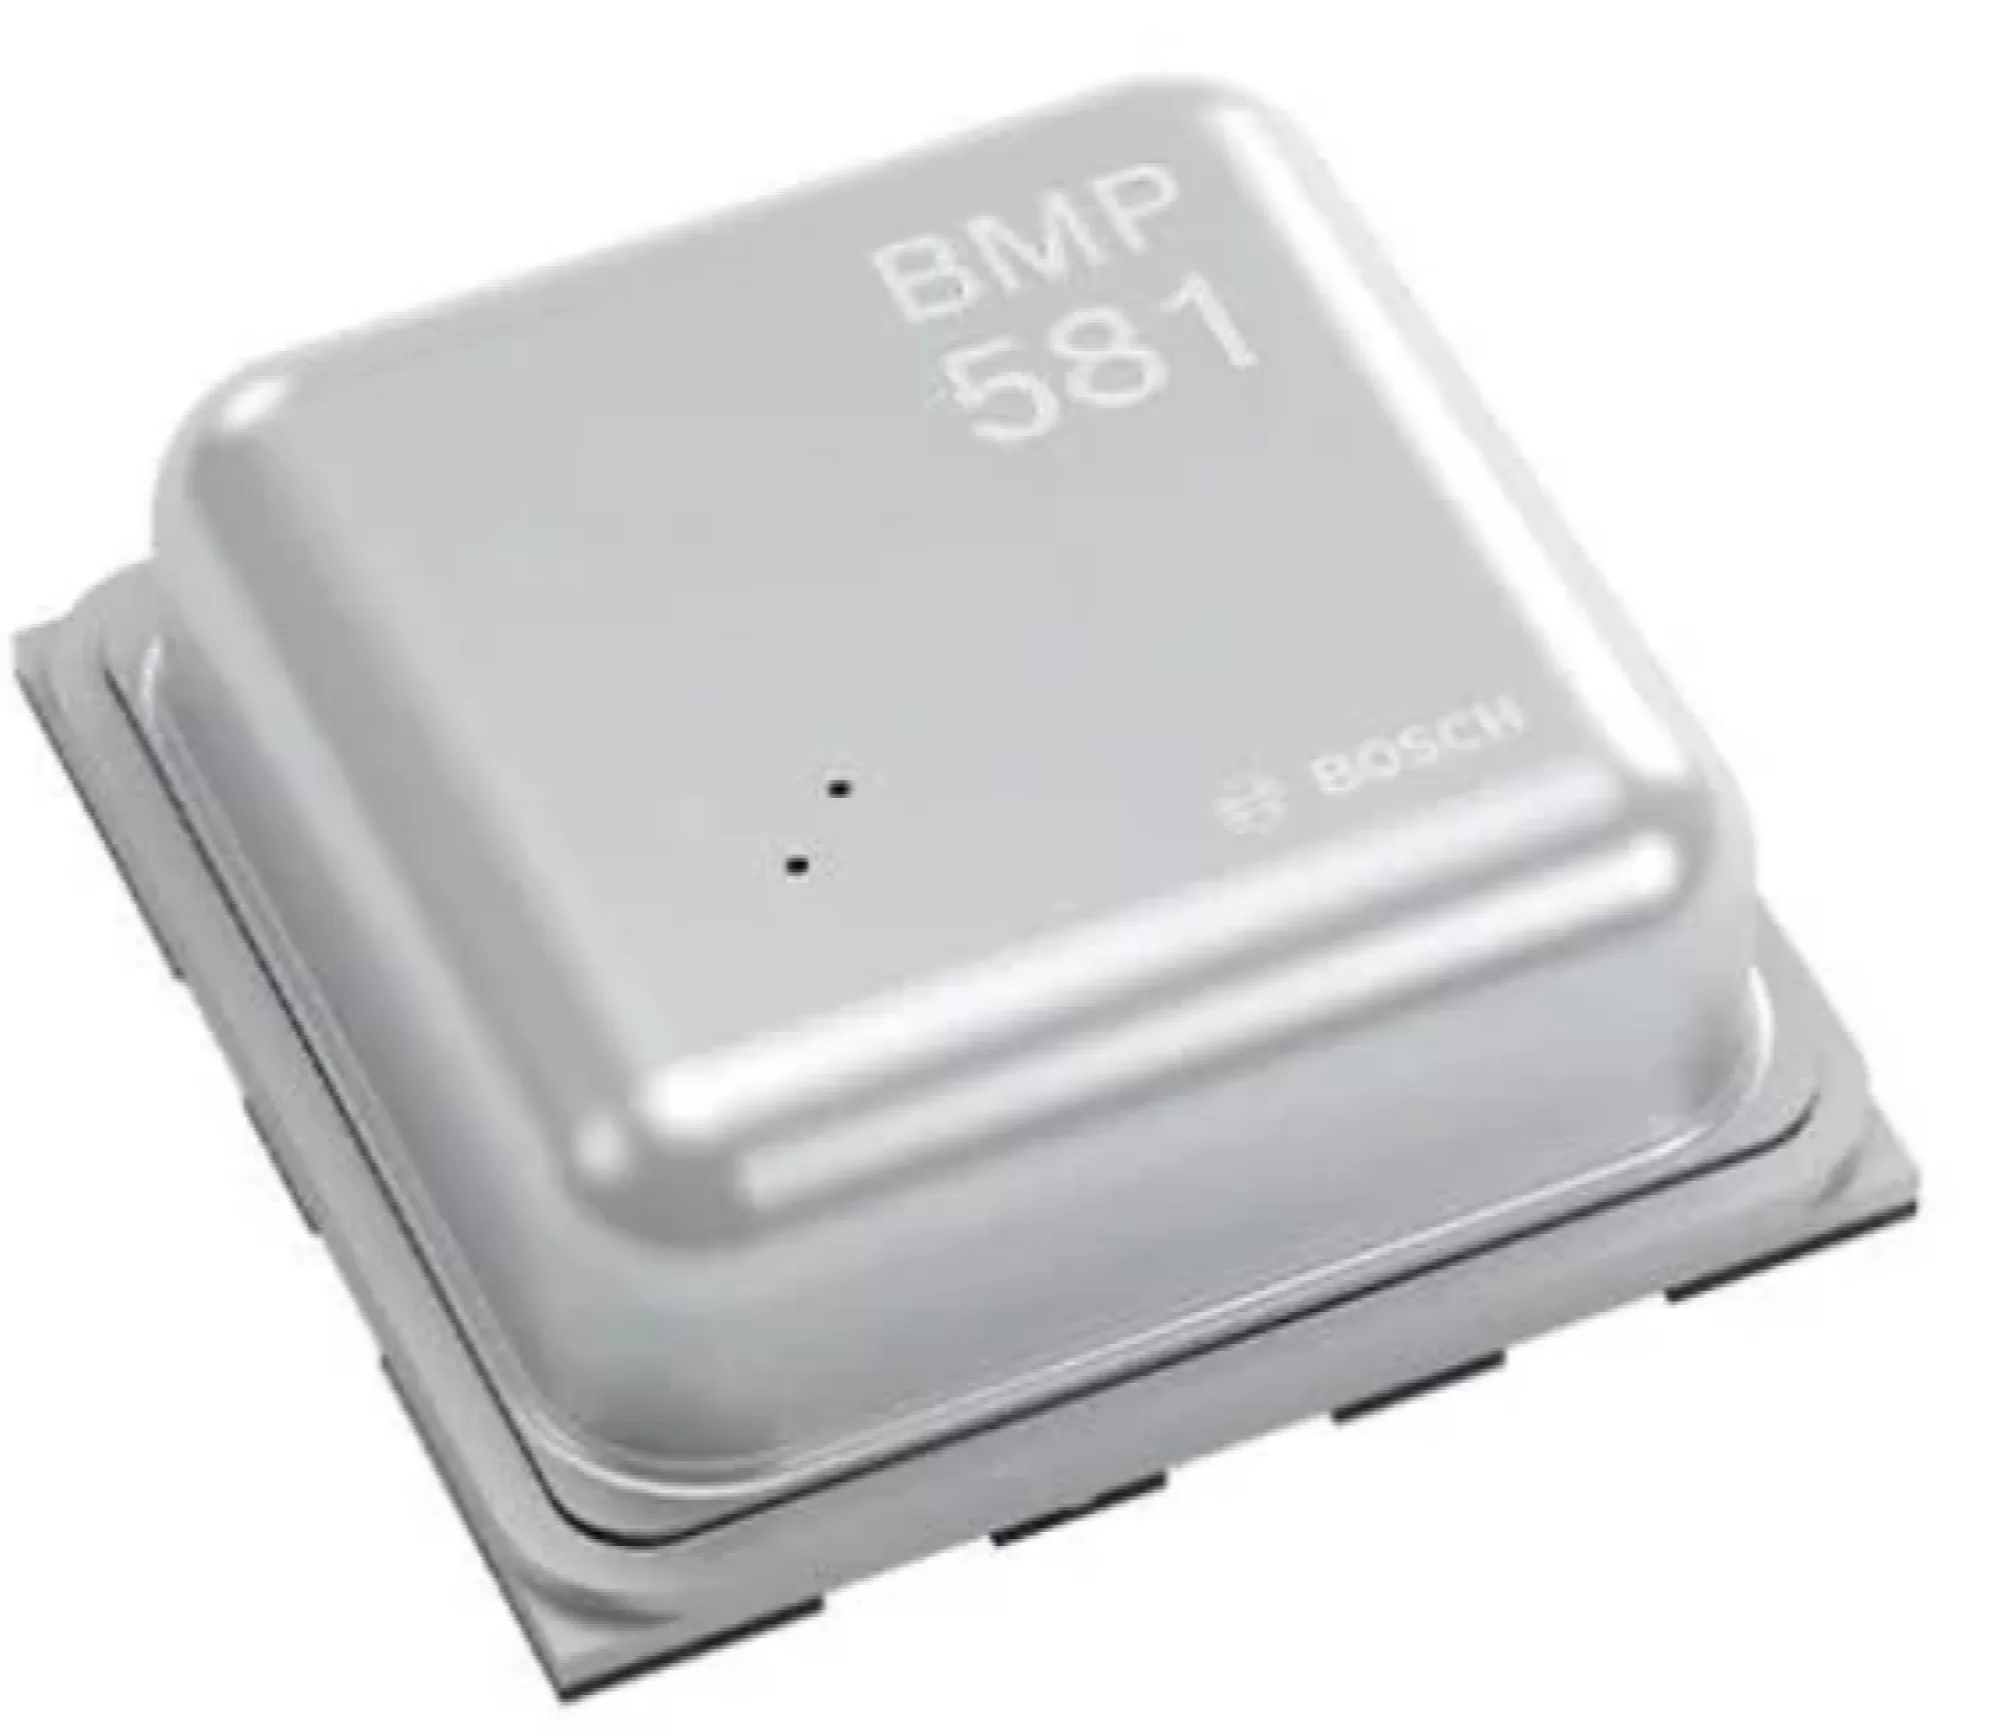
#include <Adafruit_BMP5xx.h>      // the BMP581 pressure sensor, newer boards
#include <BMP388_DEV.h>           // the BMP390 pressure sensor, older boards


// ------------------------------------------------------------------
// The Mercury V1 pins. These are the same on every board.
// Using your own ESP32? Change these to the pins you wired.
//
// A #define is just a name for a value. The compiler swaps the name for the
// value before it builds anything, so LED_POWER costs no memory and no time,
// it is only there to save you remembering which pin is which.
// ------------------------------------------------------------------
#define LED_POWER      3    // Powers the status LED. Must be HIGH
#define LED_DATA       2    // Status LED data line
#define SENSOR_POWER  20    // Powers the pressure sensor and IMU. Must be HIGH
#define I2C_SDA       21    // I2C data
#define I2C_SCL       22    // I2C clock
#define OUTPUT_PIN     5    // Ejection charge output. Keep it LOW
#define BUTTON         9    // The BUTTON on the case. LOW when pressed
#define USB_DETECT     1    // HIGH when a charging cable is plugged in
#define BATTERY        0    // Reads half the battery voltage
#define BATTERY_GND   18    // Ground for the battery divider. Must be LOW

#define LED_BRIGHTNESS 4    // Colours are divided by this. 1 is dazzling


// ------------------------------------------------------------------
// Settings you might want to change.
//
// Everything that decides how the altimeter behaves is here in one place,
// rather than buried down in the code. That is worth copying in your own
// projects: when you come back in six months, this is the block you will
// want to find.
// ------------------------------------------------------------------
#define LAUNCH_HEIGHT   2.0   // Metres above the pad that counts as a launch.
                              // 2 is for testing on your desk.
                              // Use 25 to 40 in a real rocket.
#define SAMPLE_MS       100   // Time between readings, so 10 a second
#define REF_SAMPLES     100   // 10 seconds of readings held for the reference
#define LANDED_DROP     1.0   // Metres below apogee before we look for landing
#define LANDED_STILL_MS 5000  // Height must hold steady this long to be landed
#define LANDED_BAND     0.5   // Metres of movement still counts as steady
#define FLIGHT_MAX_MS   180000 // Give up and save after three minutes
#define MAX_FLIGHTS     10    // How many flights we keep


// ------------------------------------------------------------------
// Things the sketch needs to remember.
//
// These live out here, outside any function, which makes them "global". A
// variable created inside a function disappears the moment that function
// ends, and loop() ends and restarts thousands of times a minute, so
// anything that has to be remembered from one reading to the next has to
// live here instead.
// ------------------------------------------------------------------

// The three chips we talk to, plus the flash storage
Adafruit_NeoPixel led(4, LED_DATA, NEO_GRB + NEO_KHZ800);
Adafruit_BMP5xx bmp581;
BMP388_DEV      bmp390(Wire);
Preferences     memory;

bool  have_bmp581 = false;  // set to true once we find one on the bus
bool  have_bmp390 = false;

float pressure_hpa  = 0;    // Latest pressure reading
float temperature_c = 0;    // Latest temperature reading

// The last ten seconds of pressure readings.
//
// This is a ring buffer: a normal array that we write round and round in a
// circle, overwriting the oldest reading each time. It means we always have
// the last ten seconds without ever shuffling anything about.
//
//        oldest                                          newest
//        |                                                    |
//        [  ][  ][  ][  ][  ][  ] ...................... [  ][  ]
//        \____ averaged to give the pad pressure ____/
//              (from 10 seconds ago to 5 seconds ago)
//
float ref_buffer[REF_SAMPLES];
int   ref_index = 0;        // the slot we will write to next
bool  ref_ready = false;    // true once we have been all the way round once

float pad_hpa    = 0;       // Pressure on the ground, our zero
float height     = 0;       // Where we are now, in metres above the pad
float apogee     = 0;       // The highest we have been this flight

// A struct groups related values into one thing. Without it we would need two
// separate arrays, one of apogees and one of durations, and would have to keep
// them lined up by hand. This way flights[3] is one whole flight.
struct Flight {
  float apogee_m;
  float seconds;
};
Flight flights[MAX_FLIGHTS];
int    flight_count = 0;    // how many of the ten slots are actually used

// What the altimeter is currently doing.
//
// This is a state machine, which sounds grander than it is. The altimeter is
// always in exactly one of these four states, and each one has its own small
// piece of code in loop(). It keeps things straight: without it you end up
// with a tangle of true/false flags and no clear idea which combinations are
// possible.
#define STATE_SETTLING 0    // Filling the buffer, not armed yet
#define STATE_ARMED    1    // On the pad, watching for a launch
#define STATE_FLYING   2    // Off the ground, tracking the highest point
#define STATE_DONE     3    // Landed and saved, nothing left to do
int state = STATE_SETTLING;

// Timers. millis() counts milliseconds since the board switched on, so
// comparing millis() against a saved copy of it is how you measure time.
unsigned long next_reading = 0;   // when the next reading is due
unsigned long launch_ms    = 0;   // the moment we detected the launch
unsigned long settle_ms    = 0;   // when the height last moved noticeably
float         settle_at    = 0;   // the height it settled at
unsigned long blink_ms     = 0;   // when the armed LED last winked


// ==================================================================
// setup() runs once, when the board starts.
// ==================================================================
void setup() {
  Serial.begin(115200);

  // Always first. This pin fires the ejection charge on a flying altimeter,
  // and a pin the code has not set up yet is left floating rather than off.
  pinMode(OUTPUT_PIN, OUTPUT);
  digitalWrite(OUTPUT_PIN, LOW);

  // The LED and the sensors are behind their own power switches so the board
  // can drop to almost no current when asleep. Nothing responds until these
  // two pins go HIGH.
  pinMode(LED_POWER, OUTPUT);
  digitalWrite(LED_POWER, HIGH);
  pinMode(SENSOR_POWER, OUTPUT);
  digitalWrite(SENSOR_POWER, HIGH);

  pinMode(BATTERY_GND, OUTPUT);
  digitalWrite(BATTERY_GND, LOW);
  pinMode(USB_DETECT, INPUT);

  // INPUT_PULLUP holds the pin HIGH through a resistor inside the chip, so
  // the button only has to pull it down to ground. That is why a pressed
  // button reads LOW rather than HIGH.
  pinMode(BUTTON, INPUT_PULLUP);

  led.begin();
  setLed(255, 0, 0);          // red while we start up

  Wire.begin(I2C_SDA, I2C_SCL, 400000);
  delay(100);                 // let the sensors finish waking up

  // Wait for the Serial Monitor to be opened, but give up after two and a
  // half seconds. Never wait forever: on a battery in a rocket there is no
  // computer to wait for and the sketch would hang here.
  unsigned long start = millis();
  while (!Serial && millis() - start < 2500) delay(10);
  delay(250);

  Serial.println();
  Serial.println("Mercury altimeter project 2: apogee altimeter");
  startPressureSensor();

  // Holding the button down while it starts wipes the saved flights. Handy,
  // and it saves needing a serial command or a special sketch to do it.
  if (digitalRead(BUTTON) == LOW) {
    memory.begin("rocketflights", false);
    memory.clear();
    memory.end();
    Serial.println("Button held: stored flights erased.");
    setLed(255, 0, 255);
    delay(1500);
  }

  loadFlights();
  showFlights();

  Serial.print("Battery: ");
  Serial.print(analogReadMilliVolts(BATTERY) * 2 / 1000.0, 2);
  Serial.println(" V");
  Serial.println();
  Serial.print("Settling. Keep it still for ");
  Serial.print((REF_SAMPLES * SAMPLE_MS) / 1000);
  Serial.println(" seconds.");

  setLed(255, 200, 0);        // yellow while the buffer fills
  next_reading = millis();
}


// ==================================================================
// loop() runs over and over, for as long as the board is on.
// ==================================================================
void loop() {

  // Everything happens on a steady beat of one reading every SAMPLE_MS.
  //
  // The obvious way to do this would be delay(100) at the bottom of the loop,
  // and you should get out of that habit early. delay() stops the whole
  // program dead, so nothing else can happen, and the gap between readings
  // ends up as 100 ms plus however long the work took, which drifts. Checking
  // the clock instead leaves the processor free and keeps the beat honest.
  if (millis() < next_reading) return;
  next_reading = millis() + SAMPLE_MS;

  // If the sensor did not answer, skip this beat rather than carrying on with
  // a stale or zero reading. One missed reading out of ten a second is
  // nothing; a wrong one could look like a launch.
  if (!readSensor()) return;

  // Store this reading in the ring buffer, then move the write position on.
  // When it reaches the end it wraps back to the start and begins overwriting
  // the oldest readings, which is exactly what we want.
  ref_buffer[ref_index] = pressure_hpa;
  ref_index = ref_index + 1;
  if (ref_index >= REF_SAMPLES) {
    ref_index = 0;
    ref_ready = true;         // we have been round once, the buffer is full
  }

  // ---------------- SETTLING ----------------
  if (state == STATE_SETTLING) {
    // Nothing is worth working out until the buffer has been filled once,
    // otherwise we would be averaging in the empty half of it.
    if (ref_ready) {
      state = STATE_ARMED;
      Serial.println("Armed. Waiting for launch.");
      Serial.print("Launch will trigger at ");
      Serial.print(LAUNCH_HEIGHT, 1);
      Serial.println(" metres.");
    }
    return;
  }

  // While we are still on the ground the pad pressure keeps updating, so the
  // altimeter quietly follows the weather while it waits. The moment a launch
  // is detected we stop updating it, and the rest of the flight is measured
  // against the ground we actually left.
  if (state == STATE_ARMED) pad_hpa = padPressure();

  height = heightAbove(pad_hpa, pressure_hpa, temperature_c);

  // ---------------- ARMED ----------------
  if (state == STATE_ARMED) {

    // A short green wink every two seconds says armed and alive. Winking
    // rather than staying lit uses less battery and is easier to spot from
    // the other side of a field.
    if (millis() - blink_ms > 2000) {
      blink_ms = millis();
      setLed(0, 255, 0);
    } else if (millis() - blink_ms > 60) {
      setLed(0, 0, 0);
    }

    if (height > LAUNCH_HEIGHT) {
      state = STATE_FLYING;
      launch_ms = millis();
      apogee = height;        // start the record from where we are now
      settle_at = height;     // and start watching for it to stop moving
      settle_ms = millis();
      setLed(0, 0, 255);      // blue for the whole flight
      Serial.println();
      Serial.println("LAUNCH!");
      Serial.println("time_s,height_m");
    }
    return;
  }

  // ---------------- FLYING ----------------
  if (state == STATE_FLYING) {

    // The entire job of an apogee altimeter, in one line.
    if (height > apogee) apogee = height;

    Serial.print((millis() - launch_ms) / 1000.0, 2);
    Serial.print(",");
    Serial.println(height, 2);

    // Deciding it has landed needs two things to be true at once.
    //
    // First, the height has to have stopped changing. Every time it moves
    // more than LANDED_BAND we note the new height and restart the clock, so
    // settle_ms ends up holding the time it last did anything interesting.
    if (fabs(height - settle_at) > LANDED_BAND) {
      settle_at = height;
      settle_ms = millis();
    }
    bool stopped = (millis() - settle_ms) > LANDED_STILL_MS;

    // Second, we have to be below the highest point we saw. Without this,
    // sitting still on the pad would count as a landing.
    bool descended = (apogee - height) > LANDED_DROP;

    // And a backstop, so a rocket that lands somewhere awkward and never
    // quite settles still saves its flight instead of losing it.
    bool tooLong = (millis() - launch_ms) > FLIGHT_MAX_MS;

    if ((stopped && descended) || tooLong) {
      saveFlight(apogee, (millis() - launch_ms) / 1000.0);
      state = STATE_DONE;

      Serial.println();
      Serial.print("Landed. Apogee ");
      Serial.print(apogee, 2);
      Serial.println(" metres.");
      Serial.println("Saved. Press POWER to run again.");
      Serial.println();
      showFlights();

      blinkLed(255, 255, 255, 3);
      setLed(160, 0, 255);    // purple means finished and saved
    }
    return;
  }

  // ---------------- DONE ----------------
  // Nothing left to do. The sketch never sleeps, so plug it in to charge.
}


// ==================================================================
// The functions setup() and loop() use. Have a read through when you
// are ready, they are all short.
// ==================================================================


// Set the LED to a colour, given as three numbers from 0 to 255 for red,
// green and blue. Older boards have one pixel and newer ones have four, so we
// set all four and let any spare ones be ignored.
void setLed(int red, int green, int blue) {
  for (int i = 0; i < 4; i++) {
    led.setPixelColor(i, led.Color(red / LED_BRIGHTNESS,
                                   green / LED_BRIGHTNESS,
                                   blue / LED_BRIGHTNESS));
  }
  led.show();                 // nothing appears until show() is called
}


// Flash the LED a number of times. This one does use delay(), which is fine
// here because it is only ever called when the altimeter has nothing else to
// get on with.
void blinkLed(int red, int green, int blue, int times) {
  for (int i = 0; i < times; i++) {
    setLed(red, green, blue);
    delay(120);
    setLed(0, 0, 0);
    delay(180);
  }
}


// Is there a chip at this address on the I2C bus?
//
// Every chip on the bus has its own address. Starting a message to an address
// and seeing whether anything acknowledges is the standard way of asking
// "are you there", and it is all an I2C scanner does.
bool deviceAt(byte address) {
  Wire.beginTransmission(address);
  return Wire.endTransmission() == 0;    // 0 means somebody answered
}


// Mercury boards carry one of two pressure sensors depending on how old they
// are, and the two live at different addresses, so we just ask the bus which
// one is there.
//    BMP581 at 0x46 or 0x47      BMP390 at 0x76 or 0x77
void startPressureSensor() {

  if (deviceAt(0x46) || deviceAt(0x47)) {
    Serial.println("Found a BMP581");

    // Try the first address, and if that does not take, the second.
    if (!bmp581.begin(BMP5XX_ALTERNATIVE_ADDRESS, &Wire)) {
      bmp581.begin(BMP5XX_DEFAULT_ADDRESS, &Wire);
    }

    // Oversampling means the sensor takes several measurements internally and
    // averages them, which trades a little speed for a lot less noise. The
    // IIR filter smooths the result further. Both help an altimeter.
    bmp581.setPressureOversampling(BMP5XX_OVERSAMPLING_8X);
    bmp581.setIIRFilterCoeff(BMP5XX_IIR_FILTER_COEFF_3);
    bmp581.setOutputDataRate(BMP5XX_ODR_80_HZ);
    bmp581.setPowerMode(BMP5XX_POWERMODE_NORMAL);
    bmp581.enablePressure(true);
    have_bmp581 = true;

  } else if (deviceAt(0x76) || deviceAt(0x77)) {
    Serial.println("Found a BMP390");
    bmp390.begin(NORMAL_MODE, OVERSAMPLING_X8, OVERSAMPLING_X2,
                 IIR_FILTER_4, TIME_STANDBY_20MS);
    bmp390.startNormalConversion();
    have_bmp390 = true;

  } else {
    Serial.println("No pressure sensor found!");
  }
}


// Take a reading. Updates pressure_hpa and temperature_c, and returns false
// if the sensor did not answer.
//
// We only ever ask the library for pressure and temperature. Both libraries
// will happily give you an altitude as well, and we ignore it, because
// different libraries use different constants and assume different things
// about sea level. Doing the sum ourselves means every one of our devices and
// every version of our firmware turns the same pressure into the same height.
bool readSensor() {
  if (have_bmp581) {
    if (!bmp581.performReading()) return false;
    pressure_hpa  = bmp581.pressure;
    temperature_c = bmp581.temperature;
    return true;
  }
  if (have_bmp390) {
    // This library fills in both values for us and returns true or false.
    return bmp390.getTempPres(temperature_c, pressure_hpa);
  }
  return false;
}


// Turn a pressure into a height above wherever we took our reference.
//
// Air thins out as you climb, in a way that is well understood and does not
// change. Feed in the pressure on the ground and the pressure now, and this
// gives you the difference in metres. Temperature comes into it because warm
// air is less dense than cold air, so the same pressure drop covers a
// slightly greater height on a hot day.
float heightAbove(float reference, float hpa, float temp) {
  if (reference <= 0) return 0;         // no reference yet, do not guess
  return ((temp + 273.15) / 0.0065) * (1.0 - pow(hpa / reference, 0.190266669));
}


// The pad pressure: the average of the older half of the ring buffer, which
// is the readings from ten seconds ago up to five seconds ago. Deliberately
// not the most recent ones. See the article for why.
float padPressure() {
  int wanted = REF_SAMPLES / 2;         // fifty readings, five seconds worth
  float total = 0;

  for (int i = 0; i < wanted; i++) {
    // ref_index points at the slot we are about to overwrite, which is the
    // oldest reading we still have, so counting up from there walks forwards
    // in time. The % wraps us back to slot 0 when we run off the end: if
    // ref_index is 80 and i is 30, then 110 % 100 gives slot 10.
    total = total + ref_buffer[(ref_index + i) % REF_SAMPLES];
  }

  return total / wanted;                // the average of those fifty
}


// Read the saved flights out of the ESP32's own memory.
//
// This is NVS, a small area of flash the chip sets aside for storing settings.
// It survives the power going off, the battery being changed and uploading a
// new sketch, as long as you leave "Erase All Flash Before Sketch Upload" set
// to Disabled. Storage is split into named areas, and ours is called
// rocketflights so it cannot collide with anything else on the board.
void loadFlights() {
  memory.begin("rocketflights", true);  // true means open it read only
  memory.getBytes("list", flights, sizeof(flights));
  flight_count = memory.getInt("count", 0);   // 0 is used if nothing is stored
  memory.end();

  // Never trust a stored number without checking it. If the flash held
  // something odd we would run off the end of the array.
  if (flight_count > MAX_FLIGHTS) flight_count = MAX_FLIGHTS;
  if (flight_count < 0) flight_count = 0;
}


// Put this flight at the top of the list and push the oldest one off the end.
void saveFlight(float apogee_m, float seconds) {

  // Shuffle everything down one slot, working backwards so we do not
  // overwrite a flight before we have moved it. The one in the last slot has
  // nowhere to go and falls off, which is what makes the list roll.
  for (int i = MAX_FLIGHTS - 1; i > 0; i--) {
    flights[i] = flights[i - 1];
  }

  flights[0].apogee_m = apogee_m;
  flights[0].seconds  = seconds;
  if (flight_count < MAX_FLIGHTS) flight_count++;

  // The whole array goes in as one lump. sizeof() works out how many bytes
  // that is, so this keeps working if you ever change MAX_FLIGHTS or add
  // another field to the struct. Writing it in one go is also kinder to the
  // flash than ten separate writes: flash wears out eventually, and one write
  // per flight will outlast the rocket by a very long way.
  memory.begin("rocketflights", false); // false means we can write
  memory.putBytes("list", flights, sizeof(flights));
  memory.putInt("count", flight_count);
  memory.end();
}


// Print the stored flights, newest first.
void showFlights() {
  if (flight_count == 0) {
    Serial.println("No flights stored yet.");
    return;
  }
  Serial.print("Last ");
  Serial.print(flight_count);
  Serial.println(" flights, newest first:");

  for (int i = 0; i < flight_count; i++) {
    Serial.print("  ");
    Serial.print(i + 1);
    Serial.print(". ");
    Serial.print(flights[i].apogee_m, 1);   // the 1 means one decimal place
    Serial.print(" m   ");
    Serial.print(flights[i].seconds, 1);
    Serial.println(" s");
  }
}
Testing it on your desk
Upload it, tap POWER if nothing happens, and open the Serial Monitor at 115200.
- The LED goes yellow and it tells you to keep still for ten seconds.
- It goes to winking green and says Armed. Waiting for launch.
- Lift the board up about two metres, or stand up holding it. The LED snaps to blue and the Serial Monitor prints LAUNCH! followed by a stream of heights.
- Put it back on the desk and wait five seconds. Three white flashes, then purple, and the apogee is printed and saved.
- Tap POWER. It restarts and prints your saved flight before arming again.
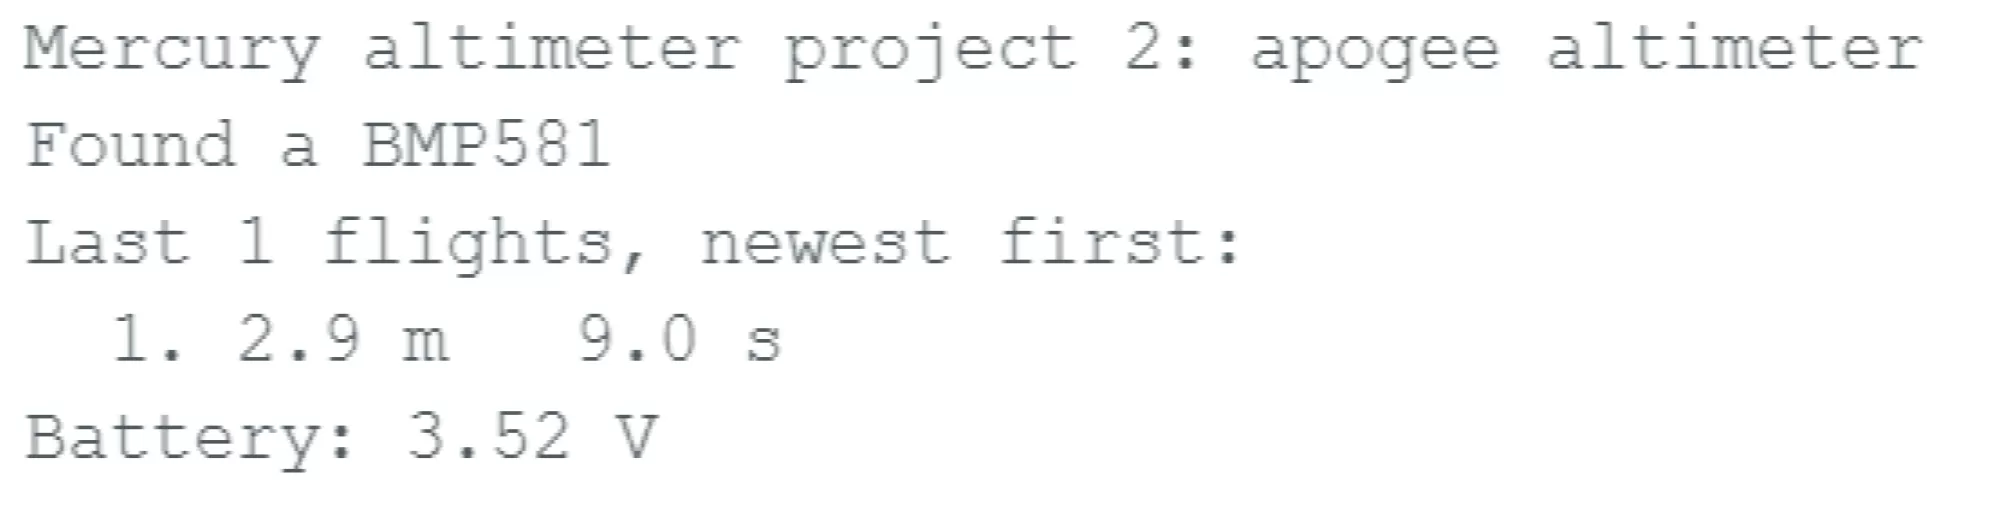 Example output after throwing at my desk.
Do that a few times and the list fills up:
Mercury altimeter project 2: apogee altimeter
Found a BMP581
Last 3 flights, newest first:
  1. 2.4 m   9.3 s
  2. 2.7 m   11.6 s
  3. 2.2 m   8.8 s
Battery: 4.11 V

Settling. Keep it still for 10 seconds.
Armed. Waiting for launch.
Launch will trigger at 2.0 metres.

LAUNCH!
time_s,height_m
0.00,2.11
0.10,2.34
0.20,2.56
If it triggers the moment it arms, you are probably holding it. Set it down and let it settle. If it never triggers, lift it higher or a bit faster: two metres of air pressure is a real difference but a slow lift lets the rolling reference partly follow you up.
Flying it for real
Three changes before this goes in a rocket.
- Raise
LAUNCH_HEIGHTto 25 or more. Nothing else matters as much. - Give it a vent hole. The bay the altimeter sits in needs a small hole to the outside air, ideally a few of them spaced around the tube, well away from the nose and any steps. A sealed bay measures the pressure of a sealed bay, which is not the same thing as the sky outside.
- Keep it out of the airflow and away from heat. You saw on page 1 what breathing on the sensor does. A hot motor mount does the same thing more slowly.
Charge it first, and remember this sketch never sleeps, so switch it on shortly before you fly rather than an hour before.
If something goes wrong
| What you see | What to do |
| It arms then immediately launches | It is moving. Put it down and leave it alone, or raise LAUNCH_HEIGHT. |
| It never detects a launch | Lift it higher and more briskly. The ground reference follows slow movement on purpose, so a gentle lift over ten seconds looks like weather rather than flight. |
| The apogee looks too high or too low | Check nothing warm is near the sensor, and that the board had its full ten seconds of stillness before arming. |
| Flights vanish after re-uploading | "Erase All Flash Before Sketch Upload" is Enabled. Set it to Disabled. |
| No flights stored yet, every time | The sketch is not reaching the landed state. Watch the Serial Monitor to see whether it printed the apogee before you restarted it. |
Things to try
The point of a dev board is that you change it. Some easy ones:
- Flash the LED green for each ten metres of apogee after landing, so you can read the result across a field without a laptop.
- Store the temperature and battery voltage with each flight.
- Record the time it took to reach apogee as well as the height. That number tells you a lot about the motor.
- Count total flights ever, separately from the ten you keep.
What this altimeter still cannot do is tell you the shape of the flight. You get one number where a graph would tell you the burn time, the coast, and how fast it came down. That is the next page: recording the whole flight and getting it out as a spreadsheet.