On Rev4 and later boards the Nano has a motion sensor (an IMU) that measures tilt and rotation through the flight. Calibrating it teaches the Nano what "level and still" looks like for your particular board, which keeps the orientation and angle figures accurate. It takes a couple of minutes, and you only need to do it once, though you can repeat it any time you like.
iINFO
Calibration only applies to Rev4 and later boards, the ones with the IMU fitted. Rev3 and earlier have no motion sensor, so there is nothing to calibrate and no calibration file on the drive.
Connect the Nano over USB so its drive appears, then open the file device_calibration.txt. Change the 0 on the very first line to a 1, save the file and safely eject the drive. The calibration runs the next time the Nano powers on.
Because you will be turning the board through several positions, it is easiest to run it on battery power so there is no cable in the way: set the flag to 1, eject and unplug, then switch the Nano on. It starts calibrating straight away instead of arming for a flight, and it sets the first line back to 0 for you once it has finished. Gyroscope first, then the accelerometer, and the LED guides you through both.
The gyroscope just needs the board to be completely still. The LED glows red and you have a few seconds to step back, then it takes its readings for around ten to fifteen seconds. Rest the Nano on something solid and free from vibration and do not touch it. It is best to do this with the Nano sitting in the orientation you intend to fly in.
If it detects any movement it warns you with an orange light. If that happens, let it finish and then run the calibration again. When the gyroscope is done it flashes green three times and moves on to the accelerometer.
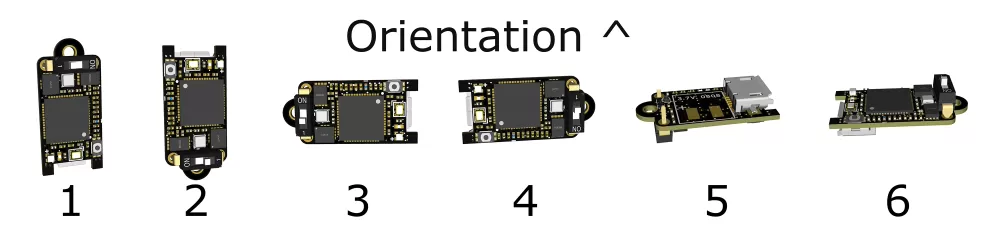
Next you place the Nano in six positions, one for each face, so it can measure gravity in every direction. It always works through them in the same order, shown below, so you can just follow the list. For every position the LED tells you how it is going:
- while the board is not yet lined up, the LED shows red or pink
- once it is held correctly the LED turns a steady cyan and takes its readings, so keep it still
- it then flashes green three times to confirm that position is captured, and moves on to the next
So the rhythm is the same each time: line it up until the light goes cyan, hold still until the green flashes, then move to the next position. There is no rush in between.
- Lying flat, components facing up (orientation 5)
- Lying flat, components facing down (orientation 6)
- On its side, micro-USB to the right (orientation 3)
- On its side, micro-USB to the left (orientation 4)
- Standing upright, micro-USB at the bottom (orientation 1)
- Standing upright, micro-USB at the top (orientation 2)
Once all six positions are captured the Nano flashes blue five times and restarts itself, so its drive will disappear and come back if it is plugged in. That is it. The calibration values are stored in the Nano's own memory and stay there through power cycles and firmware updates.
To confirm it worked, open device_information.html and check the calibration line reads Calibrated, or reopen device_calibration.txt, which now lists the measured offsets and has set the first line back to 0.
iGOOD TO KNOW
You only need to calibrate once. It is worth redoing if the board has taken a hard knock, or if your flight data starts showing tilt or orientation readings that look off.